You may know dry air irritates respiratory passages and causes difficulty in breathing. But the proper humidity percentage of your home can recall these issues.
The ideal humidity of a living room is 30 to 40 percent in winter but 50 to 60 percent in summer. So, you have to maintain this percentage of humidity in your home to live a comfortable and healthy life.
There are different expensive humidifiers online or in your nearby shops, but I want to teach you how to make a DIY homemade humidifier with a water bottle cheaper. This DIY homemade humidifier is easy to make and comfortable for your health. Still, the question is – how to make an air humidifier with a water bottle? Well, follow these 10 simple steps –
- Collect all required materials.
- Cut the water bottle and foam color.
- Put the water bottle on the foam color.
- Make a small room next to the water bottle cut part on foam color.
- Place ultrasonic anion atomizer inside the bottle.
- Place a cooling fan on the wall of the small room.
- Connect the positive and negative sides of wires.
- Attach the switch outside of the wall.
- Drill the bottle and foam color.
- Place a foam color over the whole structure.
How To Make An Air Humidifier With a Water Bottle
You may not know how to follow all of these steps. This article will elaborate on these steps to make the whole task easier. Keep your eyes on it.

Let’s go –
Step 1: Collect All Required Materials
Before collecting all necessary materials, you should prepare your mind to make a DIY air humidifier in your house. The essential materials you should consider.
- Ultrasonic anion atomizer.
- Adapter 24V-2A.
- Cooling fan 24V.
- Switch on / off.
- Water bottle.
- Foam color (a hardboard).
Tools Required:
- Knife.
- Drill (for convenience)
- Marker pen
- Glue.
Step 2: Cut The Water Bottle And Foam Color

First, start with cutting the water bottle. It is wise to have a 12 cm height bottle for water. However, you have your preference. So, you have to cut the upper and lower part of the bottle with a sharp knife. Keep this 12 cm portion near you.

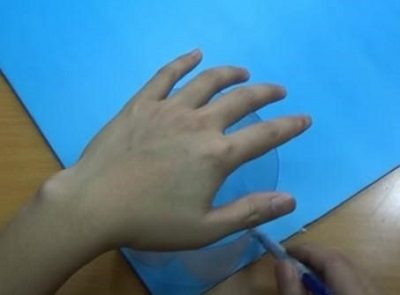
Then cut the foam color a little bit aesthetically. How? You have to put your bottle part on the foam color and sketch it with a marker pen. YouAt any side of this drawn circle, you have to have some extra foam board for fans and switches at any side of this drawn circle.
Step 3: Put The Water Bottle On The Foam Color
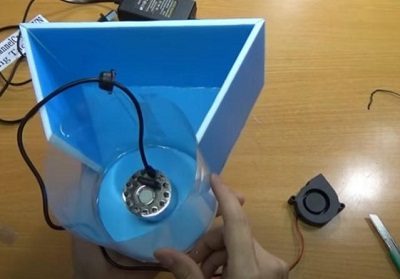
Then place the water bottle on the foam color board, adjusting with the circle. Attach the bottle to foam color with glue. You have to cut a tiny portion at the top of the bottle for fan and atomizer wire transfer directed towards the small room.]
Step 4: Make A Small Room Next To The Water Bottle Cut Part On Foam Color
You may be wondering, what is a small room? Right? As I have mentioned above at step-2 that cut the foam color aesthetically. This room is made with foam color board at three sides and a bottle wall.

Step 5: Place Ultrasonic Anion Atomizer Inside The Bottle.
Now, in the middle of the water bottle periphery, you have to put the ultrasonic anion atomizer. Once again, you have to use glue to attach it to the bottom foam color board.

Step 6: Place A Cooling Fan On The Wall Of The Small Room
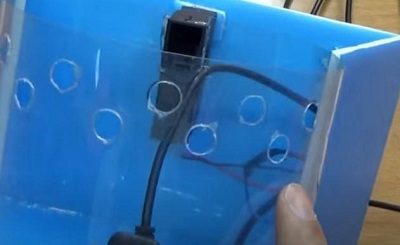
Let’s move to the small room again. You have to attach a cooling fan at the top of the bottle-sided wall. To make it firmly attached to the wall, you can glue it to the opposite wall. This cooling fan brawls air to come out of the room from the bottle.

Step 7: Connect The Positive And Negative Sides Of Wires.
To make everything automated means controlling with a single click, you have to connect wires according to science recommendations. Connect two negative sides wires of atomizer and fan. Then connect two positive sides of wires of atomizer and fan, but the connection should connect with switch.

Step 8: Attach The Switch Outside Of The Wall
Adjust the switch at the upper portion of the wall because it looks professional and beautiful. Now, you can manage the air humidifier with a single command.

Step 9: Drill The Bottle And Foam Color
This step is one of the easiest tasks. Take a drill and start making perforation for vape coming out. To look smart and add some ventilation to the small room, you can drill the outer side. Remember, do not drill where the cooling fan is located.

Step 10: Place A Foam Color Over The Whole Structure
Making your homemade DIY air humidifier with a water bottle seems eye-opening by adding shed at the top. Again, you have to follow step number two. Wait, wait, I do not recommend you come off everything you have done yet. I suggest you make the same size foam color board for the top while making it for the bottom.

Then pour water inside the bottle part. Now, connect your air humidifier to your electricity wallet and enjoy. The water evaporation or vape will come out of the bottle due to energy conversion.
Advantages Of Using An Air Humidifier
People with dry skin, bloody noses, dry throat, allergies, cracked lips, frequent coughing, etc. should use an air humidifier in their home to keep an air-dry-free environment. Here are the advantages of using an air humidifier –
- The mist or vapor prevents influenza. Around 40% humidity is enough to kill the influenza virus.
- Air humidifier keeps the air passage of the respiratory system moist and clear, so you will have productive coughing.
- It keeps skin and hair follicles moist.
- It increases the vibrant of houseplants. It also increases the longevity of wood furniture in your home.
- It prevents static electricity from building up, so the electric utility will be lower.
- It prevents snoring.
Frequently Asked Questions (FAQs)
Can I Make An Air Humidifier On My Own?
You can make an air humidifier on your own by following all of the steps listed above. All you have to do – is the bottle according to how much you want to put water in it. Then cut two foam color boards for both top and bottom. Attach the cooling fan and switch according to the instructions above. Finally, connect wires and get ready to plug them into the wall socket.
Can I Use Fragrance With Water?
You can use fragrance with water to get a good vibe inside your home. I feel better when I smell good. Fragrance doesn’t depreciate your machine because it will mix properly with water. Rather, it will diffuse throughout the home because they are gaseous.
What Can I Do If I Have Much Humidity In My Home?
Rock salt is a natural dehumidifier that absorbs water from the air. You can use it. Or, you can make an air humidifier with a water bottle like in this article we have said already. Nevertheless, you can utilize both strategies to get a higher and faster result.
How To Make A Humidifier Mist More?
The more water in the bottle, the more mist will be produced by the Ultrasonic Anion Atomizer. Not to mention, you should not put more water in the bottle than the atomizer’s vibrant capacity.
Why Is My Humidifier Not Producing Mist?
The humidifier is not producing mist due to mineral deposits. This eventually ends up building clog in the system. So, you should use distilled water rather than normal water, and clean the bottle tank properly.
Conclusion
I hope you have gained the absolute basics of how to make an air humidifier with a water bottle. So, let yourself collect all necessary materials from the bottle to the Anion atomizer. Cut the bottle, foam board, and attach the cooling fan, switch on the right position. Boom! You are going to enjoy the dry air-free room. No labored breathing, no hypoxia.
